Saturday, January 31, 2009

Everything is in the room - WooooHoooo

WOW it's been a busy day. We got up this morning and tackled putting the table and chairs together right after breakfast (I made Troy pancakes to butter him up for the work I needed him to do today Hahaha). LOVE LOVE the table and chairs.

So all the furniture was finally built and the fun began....carrying all my SCRAP CRAP upstairs. Who knew I could have so much stuff crammed in a closet that was like 3 ft by 8 ft. After a gazillion trips up the stairs everything is finally IN the room. And for the most part organized pretty good. Here's some pictures....still lots to do, but it's coming together.

First picture - looking into the room from the door.


Opposite end of the room looking towards the door. TV mounted right over the scrap table.

This is looking into the closet. We installed the Closet Maid Shelf Track system and I used the shelves I had downstairs in the closet. Funny thing - this closet is the same size as the one EVERYTHING was stored in before. To the left is my HP photo printer and Dell color laser printer.


The bookcases. Far left - my Stampin Up stamps, then my other wood mounted stamps, some notebooks with inpiration ideas in them, Xyrons, my "cutting" shelf with scissors, paper trimmers, CM shape cutters. The next bookcase is probably going to be "embellishments" and then the little one is all my primas and buttons. Then the Rails from IKEA for my punches.


The "storage wall". The end two cabinets will have the frosted glass doors on them (tomorrow) and then the midle one will be left open. The middle is where all my cardstock and paper will be stored. Then the left one is cuttlebug printed paper/cardstock and some other misc. Then the right one is my stamps cabinet - inks, embossing powders, etc. The top will be cleaned off to use as work space when using the Cuttlebug and paper gator, etc.


The Cricut Station. LOVE LOVE LOVE IT! I used the Expedit 2X4 with the desk that attaches. I have a set of LACK lights that attach to the top of the Expedit to shine light down on the Cricut Table. Used the BYGEL Rail with one of the plastic cups they have (99 cents gotta love it) to hold the tools, and then S hooks to hold my mats. In the expedit cubes are a cool box I that fits the overlays perfectly. I made dividers. More about this further down in my blog. I also have the booklets printed and in binders, then the carts are in the Plano Flipsiders. Underneath is a plastic storage cabinet that I got at J's last year - it's now empty but fit there very nicely.


The Alex - Troy painted it as it only comes in White. Looks great. It houses my office supplies in the top drawer. Prisma pencils and blending stumps in the next one, Other pens and markers, then Ribbon, embellishments and in the bottom drawer my various adhesive refills and blade replacements for various tools.


So that's my room. I'm so excited!! Can't wait to finish organizing and play!!
Thanks for stopping by! Check back for my updates! :)


Friday, January 30, 2009

We have furniture

Well it's 8:40 PM here and it's been a long busy day. Actually let's back up to yesterday. Troy and I went to Ikea last night to get the first car full (and I mean FULL) of the new furniture for the Scraproom. 2X4 Expedit, and the desk that attaches to it, 3 Effektiv units. 8 boxes in all. The car was truly full.

So this morning I get up about 8 AM and in PJ's start building furniture. Took me about 3 hours in all to get them all built. Only one injury...smashed my finger putting two pieces together. Unfortunately, my finger was also next to a screw and it took a nice chunk out of the finger along with smashing it. A little bit of cusing and a band-aid later I head back to it....Finger still throbbing like crazy, but I was almost done dangit!!

So after lunch I run to Ikea for car load #2.....by myself mind you. Was just going to get the LACK shelves for the wall above the storage stuff and then a few small things. But once there I decided that there was no reason for Troy and I to go back tonight or tomorrow for the dining room table and chairs that will be our scrap space....so I got it while there. So this car load....
  • very large dining room table (thankfully IKEA stuff has to be assembled)
  • 4 dining room chairs
  • two of the long LACK shelves (~70 inches)
  • one short LACK shelf
  • some odds and ends (small ones thankfully).
If there are security cameras in the IKEA parking garage I'm sure the security guards were having a blast watching me try to fit this stuff in my little Audi A4. First one of the dining room table boxes...I honestly do not want to know how much that sucker weighted (and neither does my chiropractor). Of course it's on the BOTTOM of the stack on my flatbed cart. So I unload everything and set it aside. Then I stand the box up off the cart...no way I could actually lift it. The cart shoots out from under it as I tip it up of course. Good thing no one was coming down that aisle in their car. DOH! So it's now resting against the bumper of the car. Hmm width of box looks bigger than I thought now. I center it with the trunk opening, and grab the end on the ground and tilt it into the truck. UGH! BARELY fits width wise...seriously it BARELY fit..like maybe 1/4 inche on each side if that. So then box #2 of the table (first one was just the pieces for the top)...thankfully it's not too bad weight wise, but it's long. Good thing Troy wasn't with me on this trip....pushed the passenger seat ALL the way up. Box barely fits. WooHooo Okay so now the chairs...hmmm those boxes look bigger now too. Took some thinking and a few tries but they fit. Now at this point I had NOT bought the LACK shelves (forgot them until I was next in line for the cashier). So back in I go...since they were the main reason I went to begin with.

Back to the car with the shelves. Now where to put these things in this already packed car. Oh did I mention they are ~70 inches long...yes I know I did, just making sure you remembered. They were longer than the 2nd table box...remember I've already pushed the seat up as far as it will go. First one went in pretty easy sliding it on top of the chair boxes. However the second one took some doing. My trunk itself is very large, but the opening....not so much....width or height wise. The small shelf thankfully was small enough to go behind the front seats with everything else. Oh dang, forgot I also picked up 4 glass shelves for the Billy bookcases I already had in the room. GLASS....those were placed in the safety of the front seat. Yep good thing nobody was with me.

So home I head...with two LACK bookshelves peaking through the front seats. No fast stops or I'd be needing a new windshield. On the way home I decide to make a quick stop at Home Depot....needed an extension cord that had a flat plug for behind the storage stuff. Well I decide to pick up the pieces to put the closet maid shelf track system in the closet so we don't have to run out again for that (not that Home Depot is that far away...but heck I'm here right?). Thankfully I just needed the rails and not any shelves (moving the ones from the coat closet up there). But those things are 84 inches long.....yep you guessed it, slid up between the seats with the LACK shelves. Okay home we go.

WOW - long post! Sorry to go on and on....it was a very interesting day to say the least. Troy arrived home a bit after I did and he started hanging the rails in the closet, then on to the shelves. I decided to go with just one of the long LACK shelves after all. Yep have to put that darn thing back in the car to take it back. Yippee!!

Okay now for the part you have been waiting for.....PICTURES.

This first one is the Expedit with the desk that attaches to it...very cool. This will be the Cricut station. My computer is just to the right where you can't see, so I'll be able to use Design Studio with it.

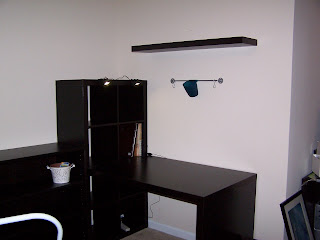
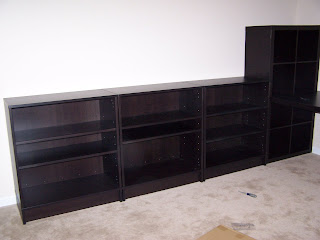
The "storage wall". Next to the Expedit is the Effektiv units. I went with just one of the high add ons so that it's just above counter height. This will house the cuttlebug, Bind-it-all on the top. Then storage. The two outside ones will have glass doors on them then the middle one will be my paper storage. The cropper hoppers fit perfectly in them (they are deep enough).

The storage wall after Troy hung up the LACK shelf.

So that's where I'm at for now. IF I can move tomorrow morning I'll continue bringing everything up from downstairs and getting it put away. We also have the dining room table and chairs to put together too.
More updates to come........


Sunday, January 25, 2009

Cart Organization....

I had outgrown my current storage system for the overlays that come with the Cricut Cartridges. I saw an idea on the message board for making dividers so figured I'd give it a try.

I found this cute box at Michael's that's the perfect width for the overlays. Thanks to Leanne for helping out by taking my call and measuring the overlay while Beth and I were at Michael's shopping last week. :)

The lady that posted this idea posted a cut file, but the dividers weren't quite big enough for my box. So I tweaked it a bit. So proud of myself. I used some old manilla folders to make them. Even cut the inserts with my cricut and then used my label maker. I made them a tad taller than the box - knowing I probably wouldn't put the lid on it. This made it easier to flip through. Brads hold the label.

Sometimes it's hard to visualize the size of the fonts, or how they will look. So I cut samples from 1" to 3" and glued to the front of the appropriate divider. I plan to cut some shapes out of the shape carts to decorate the front of the other dividers.


Let the transformation begin.........

Yesterday morning Ryan came over to pick up the Bed and Dresser. They are "storing" it in their Guest Bedroom that didn't have furniture in it. While he was here he helped Troy move the treadmill to the other room....that thing is heavy, akward and just a royal pain. So here is a picture of the empty space where the bed was and the new wall of storage will be.

Next Troy tackled mounting the TV on the wall for me. It is awesome. Hmm just realized I don't know where the remote ran off to.

Here is my desk under the window. LOVE it. It has the computer on it now. And I can sit here on the computer and watch the activities of the neighborhood.


Well that's all the updates I have for now. Next weekend is the big trip to IKEA to get the rest of the furniture. So stay tuned for pictures of the room coming to life. I so can't wait!!!!!!

Progress....clearing out the old to make room for Scrappers Paradise

So I started with clearing out the books off the bookcase.....making progress. Oh and I relocated the Soldier boxes to the dining room. A few folks have recently made donation to help with shipping so I can get several boxes mailed off this week.

Here is a picture of the Expedit we put in our bedroom to hold the books I wanted to keep. A lot of the paperbacks I boxed up to send to the troops.


Before the transformation began.....

Here are the shots of the room before. Normally it didn't look this cluttered. BUT Troy wanted to park in the garage when it got cold so I moved the Care Packages for Soldiers project up here. The bed is covered with stuff that still needed boxed up.


Can I just say BOXES BOXES EVERYWHERE!!!


MORE BOXES!

The bookcases that are staying in the room...the only furniture staying. But they were going to hold craft supplies, so what to do with all the books. I ended up buying one of the Expedit's (2X4) from Ikea and putting it in our master bedroom laying on it's side (2 high, 4 across). It looks great.

So there ya have it.....


Designing Scrappers Paradise

So in my last post I mentioned that IKEA has software to help you design the room with their furniture. Here are a few screenshots of the room design.

This one shows the room as if you were looking through the walls. On the right are the original bookcases that were in the room. It's hard to see with this shot, but under the window is the desk and then the ALEX unit that I got from IKEA. It only comes in white, so Troy is painting it black for me. Have I said what an awesome Fiance he is? He's definately a keeper. :) Okay back to our tour of the room....on the left in the "back" is the EXPEDIT (2X4) with the desk they now have that you can attach to it. This will be the Cricut station. Then there are three cabinets from their EFFEKTIV system. Two will have doors and one is open shelves. The open shelves will hold my paper holders. On top will be the Cuttlebug station. I'm putting shelves above this stuff - just not quite sure what I want yet, so waiting until I get that wall of furniture in place to decide. Then in the middle is a dining room table from IKEA that will expand to accomodate my dear friends when they come over to scrap. And even found some cool and comfy dining room chairs at IKEA for the table.

So that's the planning. I, being the OCD person that I am, have a word document with the various pictures from the software pasted in and then notes about what is going where.


So here is the floorplan. Above the Dining Room table the TV is hung (another Troy project - thank you sweetheart).
Stay tuned - more to come as the transformation continues.


Why have a guest room when you have no guests??

So I've finally decided that I WANT A SCRAPROOM!! The dining room table has been great as it gives us room when the girls come to scrap. Though we've expanded to TWO white folding tables and sometime even a card table. But - I'm tired of either looking at the clutter (when I leave everything out) or putting it all away. I've also outgrown the Coat Closet we original converted to my scrap storage.

So....Why do you need a guest room when you have no guests?? Granted mom has been out to visit a few times and one or two other people may have stayed, but that's it in the two years I've lived in the house. So I made the decision that the guest room was going to be converted to my new Scraproom....Scrapper's Paradise we are calling it (Thanks Beth). We have a nice queen size air mattress (even one that is up off the floor) for anyone that wants to come visit, so guests are still welcome. :-)

So then the task began....designing the new scraproom. Oh what fun this was. I already had 4 bookcases in the room that are black, so knew I wanted to go with the black (or black/brown) furniture so it all matches. And Troy's desk is also the "black/brown" so we swapped desks. For the rest IKEA here we come! Did you know they have tihs really cool program that allows you to design your room using their furniture? It's AWESOME!! Pictures in next post