So it's been two weeks now I guess since the completion of Scrapper's Paradise.....my new scraproom. I LOVE LOVE LOVE IT!!!!!!!!!!!
I find it so peaceful in here (yep I'm in here now). And love having all my supplies organized and so easy to get to. Even clean up is a snap!!
The girls have been here a few times to scrap and it truly is easier.....well except maybe them having to lug their bags up the stairs. I told Beth to not even ask for an elevator as it's not happening!! LOL
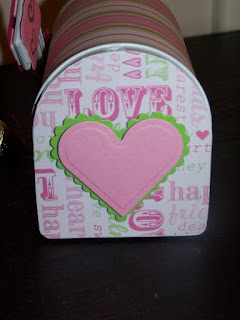
I decorated the mailboxes from the dollar bin at Target as one of my first projects in my new room. I completed 5 of them (my mom, Troy's folks, Troy's grandparents and my mom's parents....and one for Troy).
The ones to our family I put these little cards inside. Everyone is excited about the wedding so thought these would be fun. "Hugs and Kisses from the future Mr. & Mrs." In Troy's it was "Hugs and Kisses from your future Mrs.".
I only got a chance to take pictures of one of them before the battery in the camera died. And then I was in a rush to get them packed and shipped on Tuesday so I didn't get the rest of the pictures taken. :( This one went to Troy's Mom.
Saturday, February 14, 2009
New Clear Stamp Storage
Well my clear stamp collection continues to grow, and grow and grow (it's all Beth's fault). I was up to three rather large, stuffed to the max 3-ring notebooks. While plotting out my scraproom I wanted a different way to store my clear stamps. I remembered that folks in our call center in the Phoenix office had these desktop "binders". Basically a 3-ring notebook (a rather large one mind you) that was always on their desk and easy to flip through. Off to the internet I go....no idea what this thing is called....I started with office supply websites and doing searches on various names, no luck. UNTIL.....
It was exactly what I was looking for. I ordered it two weeks ago and it arrived Friday with the jars (see previous post). Good mail day yesterday!! Hehehe
I ordered the basic ScrapRack with 7 Spinders to get started. And the pack of 15 dividers - figuring the larger size would work better than regular dividers that aren't always wide enough for some of the photo pages, sheet protectors, etc.
I sat down and decided on my categories and organized all my acrylic stamps today. WooooHooo
It fits very nicely on one of the EFFEKTIV cabinets from Ikea. And all my stamping accessories are stored in that cabinet so it's all grouped together....making my "OCDness" very happy! LOL I may do some more research on the pockets that they sell for the embellishments (they have many different varieties with various combinations of different pocket sizes) and see how my stamps will work in those. But for now I'm THRILLED with how this is working. So far I have 5 spinders used...and see the need to divide one or two of them in the not so distant future. I'm just using the original sheet protectors, photo pages and baseball trading card pages I was using in my binders.
I'm so excited as this is going to make my stamps so much easier to use. I'm going to put pages in each section of indexes for my stampin up stamp sets as well so that as I'm "browsing" I can see all my stamps in one place!
Color, Color and more Color
While surfing the internet looking for ideas for my scraproom I found myself drawn to the beautiful pictures posted by people that group their embellishments (Ribbon, Primas and Buttons) by color. I decided that in my new room I wanted to do this. So I started looking for jars/bottles. I knew I was going to want different sizes and that I'd want them all to match (in some areas, this being one of them, I have a major case of OCD). I couldn't find one "set" that I liked in the stores. So off to the internet we go.
I finally settled on plastic (thank you Olivia) - no breakage and portable! :) I found some cool square jars in three different sizes. I ordered all three sizes - 4, 8 and 16 ounces. The smallest quanity I could get of each size was 24...not too bad. With shipping it came out to $1.30 a jar. Not bad at all. So the box arrived yesterday. A tad larger than I envisioned, but light as could be - another advantage to plastic.
So today came the task of sorting my primas (for those that don't know those are flowers), buttons and ribbon. Thanks to my dear dear best friend Beth things went pretty quickly.
The cute "starbucks" bottles of Primas I just couldn't seperate. As I use them I'll eventually decide there isn't enough in the bottle anymore and put them in the color jars. And the Paint Can one has some BIG flowers in that just didn't fit right in the plastic jars so they stayed in their original home as well.
JACKPOT!!
I found several bottle/jar manufactures that would sell in what I considered small quanties (hey they weren't asking that you buy 100 of each or spend a gazzillion dollars with them so I was good). Then the overwhelming task of glass or plastic, what shape, what color lids....oh my!!I finally settled on plastic (thank you Olivia) - no breakage and portable! :) I found some cool square jars in three different sizes. I ordered all three sizes - 4, 8 and 16 ounces. The smallest quanity I could get of each size was 24...not too bad. With shipping it came out to $1.30 a jar. Not bad at all. So the box arrived yesterday. A tad larger than I envisioned, but light as could be - another advantage to plastic.
So today came the task of sorting my primas (for those that don't know those are flowers), buttons and ribbon. Thanks to my dear dear best friend Beth things went pretty quickly.
The cute "starbucks" bottles of Primas I just couldn't seperate. As I use them I'll eventually decide there isn't enough in the bottle anymore and put them in the color jars. And the Paint Can one has some BIG flowers in that just didn't fit right in the plastic jars so they stayed in their original home as well.
We have now learned that I have TWO, or maybe it was THREE PURPLE buttons! Yep that's it...need to go hunt down some purple buttons. Oh and Yellow/Orange buttons - non exsistant in my collection. Some colors needed two of the large jars to hold all the Primas. And with the ribbon I used the medium and large jars - depending on how much I had for that color. I have tons more ribbon - but just sorted out the part that was in my ribbon purse thingie.
If you are interested in the company I bought the jars from check out SKS Bottle. I ordered on Sunday night and had them by Friday.
Monday, February 2, 2009
Ta-Da.....it's "DONE"
Okay so the room is "done".....of course we all know that papercrafters rooms are never truly "done". I'm very very happy with how everything came together. All my OCD and planning paid off! LOL
Every Monday night "the girls" come over and scrap here as my Fiance (Troy) plays in a pool league on Mondays. We have about 7 of us total that are regulars, but usually only 2 or 3 are available on a given Monday. So the table should work great. And if we do have a bigger crowd I have a white craft table we can setup just outside the room in the "loft" or landing area. So the early bird gets the primo spot!! :)
So here are the updated pictures.
Looking into the scraproom from the door. Everytime I walk into the room I just smile. :) I'm so loving it and can't wait to get started creating in it.
What I call "the storage wall". The bottom cabinets are the EFFEKTIV series from IKEA. I went with just the base (plinth) and the High Add On. This created a nice work surface at about counter height for the Cuttlebug, Paper Gator and it will hold my Stamps...which I'm moving to The ScrapRack when it comes. Not planning on using their inserts, just the rack itself. I already have all my stamps in the baseball card and other type holders in binders.
The far left cabinet on the storage wall houses the Cuttlebug folders and plates (in white box), my patterned paper and then some projects that I have been gather items for.
The cabinet on the right houses my stamping supplies - ink pads, embossing powders, alcohol inks, glitter glue (my Glitter Stairs from Nicole's Dad are on their way). The little white pale is holding some Ikea paint brushes that work great for cleaning up embossing powder.
Then we have the beloved Cricut Station. This is made up of the Ikea EXPEDIT (2X4) with the attached desk that they have. Then the small LACK shelf above.
Here is a picture of the Expedit cubbies up close. I made dividers for the box on the left to hold my cartridge overlays (more on that somewhere down in my blog) and then the two plano holders on the right hold the cartridge. Below are the notebooks that hold the cartridge print outs. The greyish bos on the top right is where I put cuts someone makes and then decides not to use so someone else can come along and grab them if they will work for them.
I used the BYGEL rail (found in their kitchen section) and the S hooks hold the mats and one of the 99 Cent cups they have holds the tools.
My Desk area. There is a bit of a recess in front of the window which worked perfectly for my desk and the Ikea (seeing a trend here) Alex unit. The computer is close enough to use DS with the Cricuts as well so it worked out really great. Plus I can watch the neighborhood out the window (I am the neighborhood watch coordinator, social director and the one that everyone comes to for "stuff"...we found these dogs do you know who they belong to, who drives the red truck, what's the scoop with so and so....yep we have our very own Wisteria Lane)
Next we have the right side of the two Ikea Billy Bookcases that are flanked on either side by the Ikea BENNO units (designed to hold CD's and DVD's). I found that the Stampin Up sets fit perfectly in the BENNO. My other wood mounted stamps are stored here along with the "inspiration" shelf which houses my magazines as well as binders of cards, layouts and page maps we use for ideas. My larger Xyrons and cutting tools are also stored below.
Then the left side of the bookcases. Top shelf is empty...but we'll remedy that soon I'm sure. Have my jars of skittles and then my embellishment boxes. My CAD II and Ribbon holder. Baskets with my In Stitchz and some other embellies. Then old photo albums are on the bottom shelf. And more BYGEL rails to the right to hold punches.
Now the best part of all....the scrap table! it's a dining room table from.....IKEA! DUH! it's the BJURSTA and has two leaves that store under the table. I have one leaf in now and if we were to add the 2nd you couldn't walk around it. The chairs are..........of course IKEA. They are NILS and come with two choices of covers right now. I love the blue, adds a nice pop of color. And then the TV that was in the room when it was a guest room and I had my sweetie mount it on the wall.
The closet to the right houses my printers and shelves with various things on them....like my Envelope stash.
I also left room for the girls to store their scrap bags in the closet if they want. As several live in the neighborhood.
I know most of the info is repeat from previous posts, but wanted to make sure to provide the info as I've had tons of questions about the new room - which is awesome as I'm happy to help. I searched the internet for months collecting ideas for this room and am happy to give back.
So that's it...all done! Tonight is the Grand Opening of Scrapper's Paradise. We are going to have a little celebration in honor of the new room before we get down to some scrapping.
Thanks for stopping by!
Sunday, February 1, 2009
Cardstock Storage
So this morning I spent some time setting up my new Cardstock Storage. Can't claim this as my own idea as I saw it on the internet somewhere while looking at pictures to get ideas for building my room.
The EFFEKTIV units from IKEA are deep enough to hold the 12X12 paper holders, and the shelves are adjustable so height isn't a problem.
I used a Cropper Hopper Paper Holder for each color.
And inside each one is the smaller "project" holders that holds that colors scraps. I can really see me using my scraps more this way as they are so easy to get to. And they are easy to file the scraps when cleaning up after a project.
I also had plenty of dividers so I've placed a divider in each CH and have paper (or lighter weight cardstock) on one side and cardstock on the other.
And then above that are the other two shelves. The middle one is just tall enough to hold my Iris container that has a stack of papers that I found at CostCo or Sam's some time ago. Then the top is my 12X12 stacks, magazine holders on their sides holding Vellum, Transparencies, GP White Cardstock, and a small CH holding some of my smaller stacks and packages (like freebies from Archiver's).
Subscribe to:
Posts (Atom)